When you’re managing a blog or a website, knowing the basics of HTML and CSS can be a very useful skill to have. Even if you’re not planning to build your own website from the ground up, certain things like styling text or making linked images, are important to know.
In the previous article, we discussed what HTML is, how it differs from CSS and how they work together. Now that you have a decent understanding of HTML, we can talk about what CSS is and how to use it to change our web pages.

What is CSS and how does it work?
CSS stands for Cascading Style Sheet. It is applied to HTML and allows you to change the font, color, style and size of text; background colors, margins, paddings and borders … It can also be used to position elements on a page.
Cascading Order
The term “cascading” refers to a system by which the browser decides what CSS styles to apply to an HTML element. In CSS, several styles can be applied to the same element and this may result in conflicts. The cascading order is made of a set of rules that determine what styles have higher importance and therefore should be applied.
Furthermore, multiple style sheets can be applied to the same piece of HTML code. This is how we are able to override predefined styles from our themes or plugins, as our custom style sheet is usually the last one read by the browser.
Where to add custom CSS in WordPress
1. Use The WordPress Customizer
This is a super-easy method that allows you to see your changes with a live preview instantly.
➜ In your WordPress dashboard navigate to Appearance > Customize to open the WordPress Customizer.
➜ Then, select the Additional CSS option from the menu on the left.
Now, you can simply type in your lines of CSS code to the editor. If you mess up any syntax, the editor will alert you of your errors.
2. Add Custom CSS to a Page or Post
CSS styles can be added directly to the HTML element by using the “style” attribute. These are called “inline styles” and are unique to the element that holds them. They have the highest order of importance and will override any style sheet.
You can add inline styles through the Code editor in your admin area. The style attribute can be applied to any element and it can hold as many CSS properties as you like. Different properties are separated by a semi-colon as in the example below.
<h1 style="color:blue; margin-left:30px;"&tg;This is a heading</h1>CSS Syntax
At its simplest, CSS is just a list of rules. Each rule consists of a selector and a declaration, which contains a CSS property name and a value.
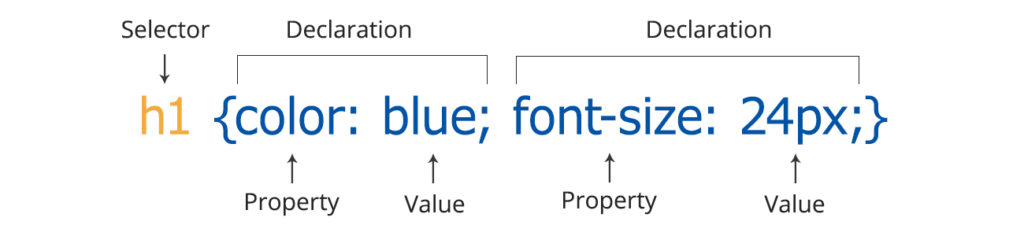
Selector
The selector points to the HTML element we want to style. When defining an HTML element, we use the tag name without the opening and closing brackets. For example, if we wanted to style the <p> (paragraph tag), the selector would simply be “p”.
Declaration
A declaration is the portion of the rule between the two curly braces. This is what tells the browser how to style the HTML tag that has been selected. Each declaration has two parts – property and its value.
Property and Value
Properties are identifiers that indicate which stylistic features (e.g. font, color, background color, size) you want to change. A property is always followed by a colon (:).
Every property has its own collection of possible values. A value is always followed by a semi-colon (;).
p {
  text-align: center;
  color: red;
  font-size: 16px;
}
In the example above the selector is “p”, which targets all the paragraph elements. All paragraphs will be aligned in the center, with a red text color and a font size of 16 pixels.
Selectors
There are three main categories of selectors:
1. The element Selector
This selector selects all elements of the same type on the website. For example, you can target all links with the <a> element. Or, you can target the entire body of the website with the <body> element.
<p>Every paragraph will be affected by this style.</p>

p {
text-align: center;
color: orange;
}
In the example above, all <p> elements on a page will be aligned in the center, with an orange text color.
2. The class selector
The class selector selects elements with a specific class attribute. A class selector always begins with a period (.), followed by the name of the class.
<h1 class="center">Green and center-aligned heading</h1>
<p class="center">Green and center-aligned paragraph.</p>

.center {
    text-align: center;
    color: green;
}
In the example above, all HTML elements with class=”center” will be green and centered.
You can also specify that only specific HTML elements should be affected by a class.
<h1 class="center">This heading will not be affected</h1>
<p class="center">This paragraph will be red and center-aligned.</p>

p.center {
    text-align: center;
    color: red;
}
In the example above, only <p> elements with class=”center” will be aligned in the center.
HTML elements can also refer to more than one class.
<p class="center large">This paragraph refers to two classes.</p>

p.center {
    text-align: center;
    color: red;
}
p.large {
    font-size: 300%;
}
In the example above, the <p> element is styled according to class=”center” and to class=”large”.
3. The id Selector
Id selectors are very similar to class selectors, but as class attributes can be applied to multiple elements, the id selectors can only be applied to one element on a page. An id selector always begins with a hash character (#), followed by the name of the id.
<p id="para1">Hello World!</p>
<p>This paragraph is not affected by the style.</p>

#para1 {
    text-align: center;
    color: red;
}
In the example above, the style will only be applied to the paragraph with id=”para1″.
Properties and Values
Here is a list of common properties and values you will probably come across or use in your blog. If you are looking for some more specific ones, the complete list is available on the W3C Website.
FONTS
Font Family
The font-family property specifies the font for an element. It can hold several font names as a “fallback” system. If the browser doesn’t support the first font, it tries the next font.
Values: family-name (“Times New Roman”, Georgia, Verdana, etc.)
generic-family (serif, sans-serif, cursive, fantasy, monospace)
p {font-family: "Times New Roman", serif;}
p {font-family: Helvetica, Arial, sans-serif;}
Font Style
The font-style property is used to specify italic text.
Values: normal or italic
h2 {font-style: italic;}Font Size
The font-size property sets the size of the text.
Values: can be defined in px, em, rem, %
h1 {font-size: 40px;}
p {font-size: 1.2em;}
Font Weight
The font-weight property sets how thick or thin characters in text should be displayed.
Values: normal, bold, bolder, lighter or a number value defined by the font family (100, 200, 300, 400 (normal), 500, 600, 700 (bold), 800 or 900)
p {font-weight: bold;}
p {font-weight: 600;}
TEXT FORMATTING
Text Alignment
The text-align property specifies the horizontal alignment of a text.
Values: left (aligns the text to the left)
right (aligns the text to the right)
center (centers the text)
justify (each line is stretched so that every line has equal width)
a {text-align: center;}Text Decoration
The text-decoration property is used to set or remove decorations from the text.
Values: none, underline, overline, line-through
a {text-decoration: none;} ’underline’ is the default on links, ‘none’ removes themText Transformation
The text-transform property is used to specify uppercase and lowercase letters in a text.
Values: none (no capitalization, the text renders as it is)
capitalize (transforms the first character of each word to uppercase)
uppercase (transforms all characters to uppercase)
lowercase (transforms all characters to lowercase)
h1 {text-transform:capitalize;}Letter Spacing
The letter-spacing property increases or decreases the space between characters in a text.
Values: defined in px or em (negative values are allowed)
h2 {letter-spacing: 3px;}
p {letter-spacing: -1px;}
Line Height
The line-height property is used to specify the height of a line.
Values: defined with a number (1 is equal to the font size, 2 is double spacing)
p {line-height: 1.5;}COLORS
Text Color
The color property is used to set the color of the text.
Values: can be defined in color name – like blue, hex code – like #ff000, or RGB value – like rgb(255,0,0)
body {color: grey;}
h1 {color: #215388;}
Background Color
The background-color property is used to set the background color of an element.
Values: can be defined in color name – like red, hex code – like #ff000, or RGB value – like rgb(200,15,15)
body {background-color: #92a8d1;}Opacity
The opacity property sets the opacity level for an element.
Values: any number from 0.0 (fully transparent) to 1.0 (fully opaque)
img {opacity: 0.5;}BORDERS
Border Style
The border-style property specifies what kind of border to display.
Values: none, dotted, dashed, solid, double, groove, ridge, inset, outset
p {border-style: dotted;}Border Width
The border-width property specifies the width of the four borders.
Values: can be defined in px, em, rem, %
div {border-width: 10px;}Border Color
The border-color property is used to set the color of the four borders.
Values: can be defined in color name – like green, hex code – like #ff000, or RGB value – like rgb(255,0,0)
p {
   border-style: solid;
   border-color: red;
}
Rounded Borders
The border-radius property defines the radius of the element’s corners.
Values: can be defined in px, em, rem, %
This property can have from one to four values:
a {border-radius: 15px 50px 30px 5px;}
     - first value applies to top-left corner
     - second value applies to top-right corner
     - third value applies to bottom-right corner
     - fourth value applies to bottom-left corner

a {border-radius: 15px 50px 30px;}
     - first value applies to top-left corner
     - second value applies to top-right and bottom-left corners
     - third value applies to bottom-right corner

a {border-radius: 15px 50px;}
     - first value applies to top-left and bottom-right corners
     - second value applies to top-right and bottom-left corners

a {border-radius: 15px;}
     - the value applies to all four corners, which are rounded equally
Border – Shorthand Property
As you can see, there are many properties to consider when dealing with borders. To shorten the code, you can specify the border-width, border-style, and border-color with the border property.
p {border: 10px solid blue;}MARGIN AND PADDING
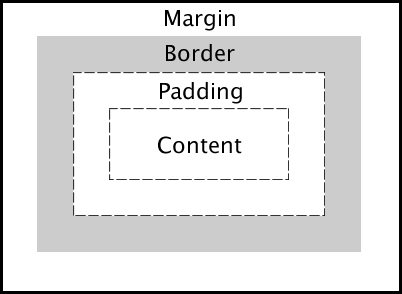
Margin
The margin property is used to add space outside of the element. CSS also has properties for specifying the margin for each side of an element:
– margin-top
– margin-right
– margin-bottom
– margin-left
Values: can be defined in px, em, rem, % (negative values are allowed)
p {
margin-top: 100px;
margin-bottom: 100px;
margin-right: 150px;
margin-left: 80px;
}

p {margin: 25px 50px 75px 100px;}
     - top margin is 25px
     - right margin is 50px
     - bottom margin is 75px
     - left margin is 100px

p {margin: 25px 50px 75px;}
     - top margin is 25px
     - right and left margins are 50px
     - bottom margin is 75px

p {margin: 25px 50px;}
     - top and bottom margins are 25px
     - right and left margins are 50px

p {margin: 25px;}
     - all four margins are 25px
Padding
The padding property is used to add space between element’s content and its border. CSS also has properties for specifying the padding for each side of an element:
– padding-top
– padding-right
– padding-bottom
– padding-left
Values: can be defined in px, em, rem, % (negative values are not allowed)
p {
padding-top: 100px;
padding-bottom: 100px;
padding-right: 150px;
padding-left: 80px;
}

p {padding: 25px 50px 75px 100px;}
     - top padding is 25px
     - right padding is 50px
     - bottom padding is 75px
     - left padding is 100px

p {padding: 25px 50px 75px;}
     - top padding is 25px
     - right and left paddings are 50px
     - bottom padding is 75px

p {padding: 25px 50px;}
     - top and bottom paddings are 25px
     - right and left padding are 50px

p {padding: 25px;}
     - all four paddings are 25px
Troubleshooting And Common Issues
Sometimes after adding your CSS code, you might get an error or a particular style definition won’t be making any changes.
Oftentimes, the reason are syntax errors:
- Check that your property names and values are spelled correctly and that property values are valid for the property names they are used on.
- Check your style sheet for missing opening and closing curly braces, semicolons or colons.
- Did you forget the dot before a class name or a hash before an id name?
- Is the class name spelled exactly the same in the HTML as it is in the CSS?
Your error may also be in the cascade. Certain selectors will always override other ones, regardless of where they appear in the style sheet.
Here are the rules:
- CSS property values with !important tag will always override all other styles – see code example below. This rule (see example below) will override all the styles targeting all paragraphs in the web page and make the paragraphs black.
- Inline styles are right behind them. They will override CSS rules from any style sheet.
- Styles with id selectors are more specific than classes and have therefore higher importance.
- Styles with class selectors are more specific than those with element selectors and have therefore higher importance.
- Element selectors are the least specific and will be overridden by any more specific rule.
p { color: #000 !important; }Hope you enjoyed this beginners lesson. Do you have any CSS questions? Was it easy to understand or too complicated? Leave a comment below and we’ll be sure to help you out!


I’m definitely going to have to read this more than once 🙂 I find CSS a little bit more complicated than HTML. Thanks for sharing!!!