Not long ago, with the WordPress 5.0 release, Gutenberg became the default content editor. While not everyone would agree with us, we think it’s a great improvement to the WordPress editing experience. But whether you like it or not, it’s here to stay for good, so you should learn the ropes sooner rather than later.
This article is the first part of a two-part series that will teach you the nuts and bolts of the Gutenberg editor, how to configure it, how to manipulate blocks, when to use them, and much more. We hope it’ll be your first step on your journey to becoming a Gutenberg master. So let’s dive right into it.
If you are not familiar with the core concepts behind the Gutenberg editor, please read our previous blog post first.
Gutenberg workspace configuration
Gutenberg offers a clean, minimal, distraction-free content editor that can be modified to help you write content easier.
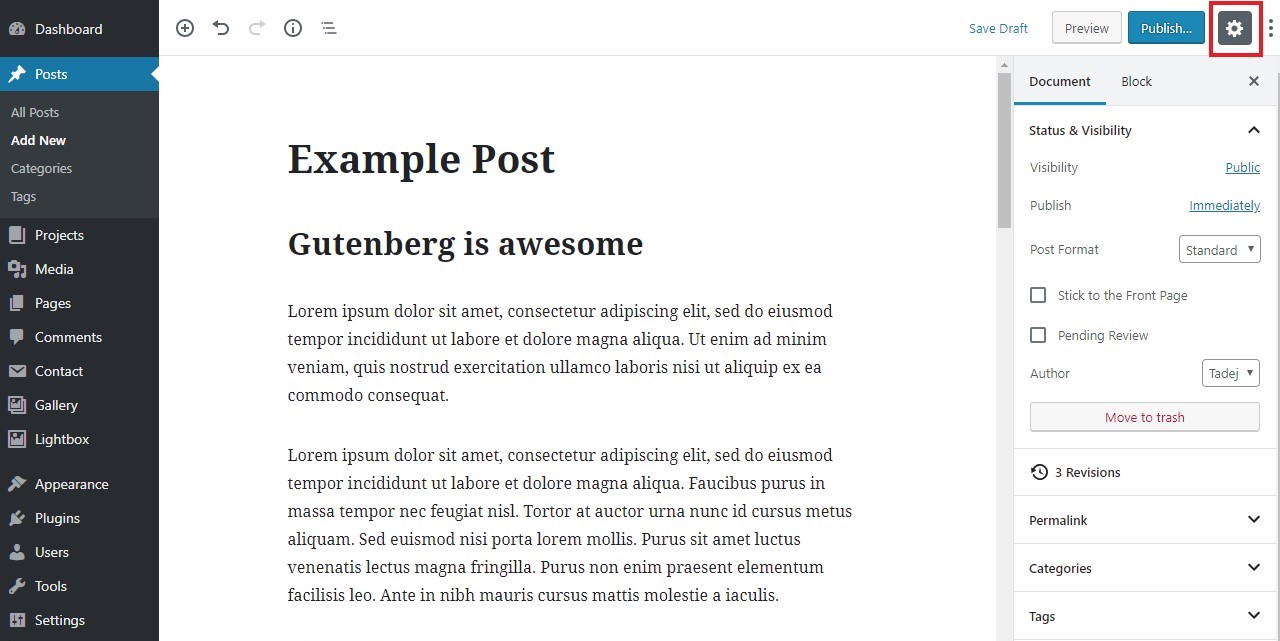
By default, the settings sidebar gets displayed on the right of the Gutenberg editor. However, sometimes you might need a little bit of extra space and a wider workspace. You can easily hide the sidebar by clicking the gear icon in the top right corner. By clicking the gear icon again, you’ll bring it back into view. An even better way to get a distraction-free, wider workspace is to click on the “Show more tools & options” icon – three vertical dots – in the top right corner of the editor’s view and check the fullscreen mode.
If you need to switch from the visual to the code editor, you can still do it. Click on the more tools icon in the top right corner of the editor’s view and select the “Code Editor” option from the menu.
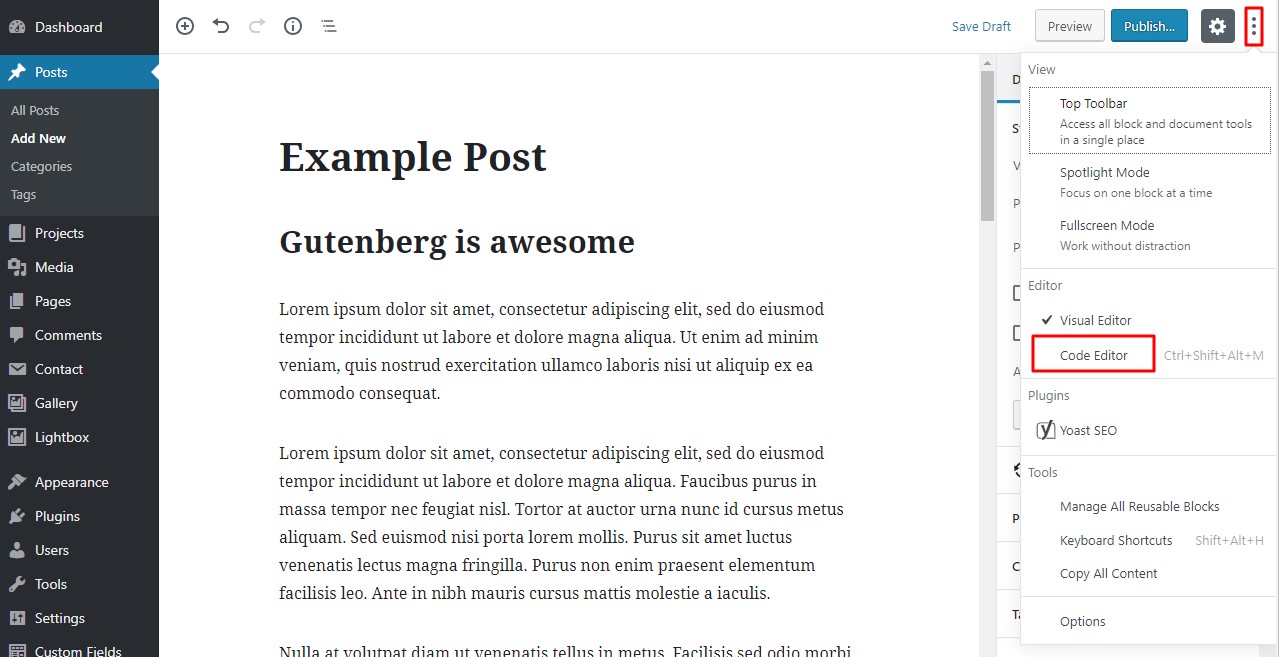
Another useful setting in this menu is the “Top Toolbar” option that allows you to position the block’s options toolbar to the top of the content editor view instead of the top of the block. It’s not our favorite choice, but it may work for some people. We also recommend you to take a look at the whole list of the keyboards shortcuts that will help you speed up the process of writing content.
Block manipulation 101
If you’ve been using WordPress for some time, you surely know how difficult it was to adjust the layout of your content with the old TinyMCE editor. Well, not anymore. Gutenberg breaks down pages and posts into smaller, more manageable blocks of content that make formatting and adjusting layouts easier and much more intuitive.
How to add new blocks
Adding blocks in Gutenberg can be done in a few different ways. The straightforward one is by hitting the plus icon in the top left corner of the editor’s view and selecting one of the blocks. This way, a new block will get added to the bottom of your content. Once you select a block, you will see the more options icon appear in the block toolbar. Click on it to open a menu with the insert after and insert before commands.
When you hover over the top edge of the block, you will once again see a plus icon, which will this time insert a block before the current one. You can also do it with your keyboard. Just hit enter, and a new block will get added below the current block. However, you will still need to click on the plus icon to select a specific block.

How to remove and duplicate blocks
You can remove blocks by selecting the Remove Block option from the more options menu. You can also use the keyboard shortcut Shift + Alt + Z. To duplicate a block, select the block you want to duplicate first, and then go to the more options menu, and click on Duplicate. Alternatively, you can use the keyboard shortcut Ctrl + Shift + D.
How to change the order of blocks
Moving blocks up and down in Gutenberg is a piece of cake. When you select a block, you will see the up and down arrows appear on the top left side of the block’s view. By clicking the up arrow, you will move the current block up, above the previous block, by clicking the down arrow, you will do just the opposite.

Most common blocks
Paragraph block
Paragraph block is a simple text block where you can add all your paragraph text. You can change the text font size, color, and background in the block settings view. You can also align text, make it bold or italic, just as you would in the previous WP editor.
Heading block
This one is pretty self-explanatory. It’s used to place headings on your page. In the block settings, you can change the text alignment, color, or heading level.
List block
This block is used for writing lists, either numbered or bulleted.
Image block
It’s a basic image block where you can add an uploaded image or one from the media library. In the block settings view, you will be able to edit the alt text, change the image size or shape. And you don’t need to open any additional windows to change these settings anymore! They are now available right here in the content editor.

Media & Text block
This block allows you to place an image on the left or right side of the text.
Gallery block
A block with which you add a WordPress gallery. Once you insert your images, you will be able to change the number of columns in the block settings.
Cover block
This is definitely one of the most exciting Gutenberg blocks as it allows you to create a cover image – an image that takes the full width of the page – and overlay it with a title. The coolest thing about it is that you can change the overlay color and opacity to make the text stand out more. You can also achieve a simple parallax effect by choosing the Fixed Background option.
Video, audio and file blocks
These blocks make it super easy to upload videos, audio, or any other files available for users to download. You can add these files from the media library, upload or drag them from your computer, or enter a URL of the location where the file is stored.
Important note! If you want to embed YouTube videos or any other social media content, it’s better to use embed blocks. You can find out more about them in the second part of this WordPress Gutenberg series.
Conclusion
So now you’ve taken the first step towards becoming a Gutenberg master. You should now be able to navigate the WordPress Gutenberg editor with ease and be familiar with the commonly used blocks. On our further journey, we will take a look at the more advanced blocks. Be sure to follow our blog in the next weeks, so you don’t miss out on it!
Are you just as excited as we are about Gutenberg? What blocks did you find the most useful? Let us know by leaving a comment below.