Are you a website owner or administrator? If that’s your case, Google Search Console is a tool you will definitely want to master. It’ll help you make your website SEO friendly and get valuable insights on how your website is performing on Google.

Important note! At the time of writing, the new Google Search Console is still under development, and some of the functionalities are only available in the old version. Currently, they are all grouped under Legacy tools and reports.
Why even bother with Google Search Console?
It helps you:
- make sure Google can access your content for indexing,
- submit new content for indexing,
- improve how your web pages are displayed in search results, and
- make your site more secure by monitoring and resolving malware or spam issues.
It offers a number of great statistical tools to get information about:
- which queries caused your site to appear in search results,
- which sites are linking to your website, and
- your site usability for mobile devices.
So where do we begin?
First things first, sign in to Google Search Console through your Google account. Once in, you will have to add a property – your website. Hit the Add property button in the top left corner of the console. You will get prompted to select between one of the following property types:
- Domain, or
- URL prefix.
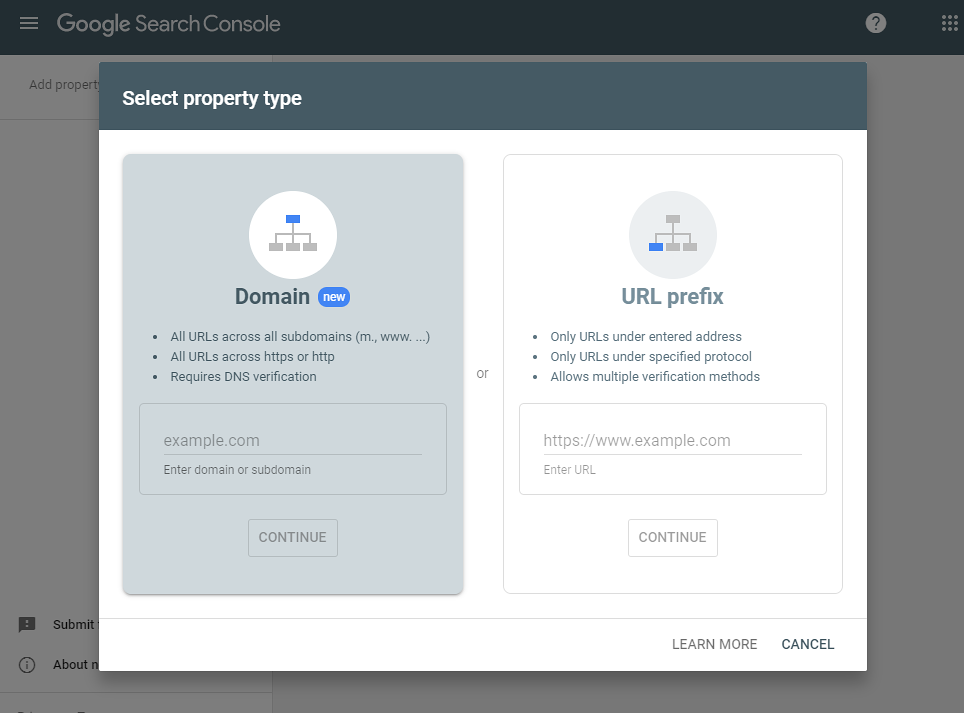
The domain property type lets you verify your website across all subdomains – www, non-www, HTTP, and HTTPS. If it’s your first time adding a property, this is the recommended way as it lets you add all of the subdomains at once. Additionally, data for all subdomains will get aggregated. The downside is you only have one method of verification available – DNS verification. To achieve this, you will have to sign in to your domain name provider and verify your domain by adding a DNS record Google provides you. DNS changes may take some time to apply, so you will have to wait a few hours up to a day for this process to be completed.
The URL prefix property type lets you verify only one subdomain at a time. By selecting this option, you will have more methods of verification available – HTML file, HTML tag, Google Analytics, DNS – so you can pick the one you are most comfortable with. But keep in mind, you will have to repeat this process for each subdomain.
Quick description of the recommended methods of verification:
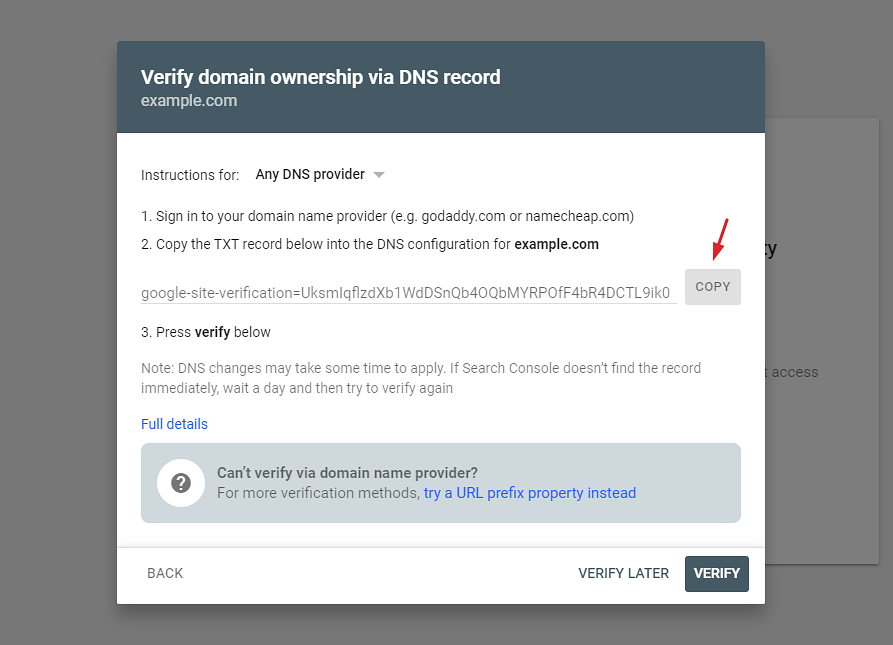
DNS Verification
- In the Search Console, click on Add property. A Setup Wizard will appear.
- Select the domain property type, enter your domain and click continue. Copy the verification record provided in the second step.
- Sign in to your domain name provider.
- In your Control Panel or other DNS management systems, add a new DNS record.
- Select a TXT record type, enter a @, your domain or leave blank, depending on the host provider’s instructions.
- Set the Time to Live (TTL) to 86400.
- In the Value/Answer/Destination field, paste the verification record provided to you by GSC.
- Go back to the Search Console and follow the Setup Wizard to complete all the steps.
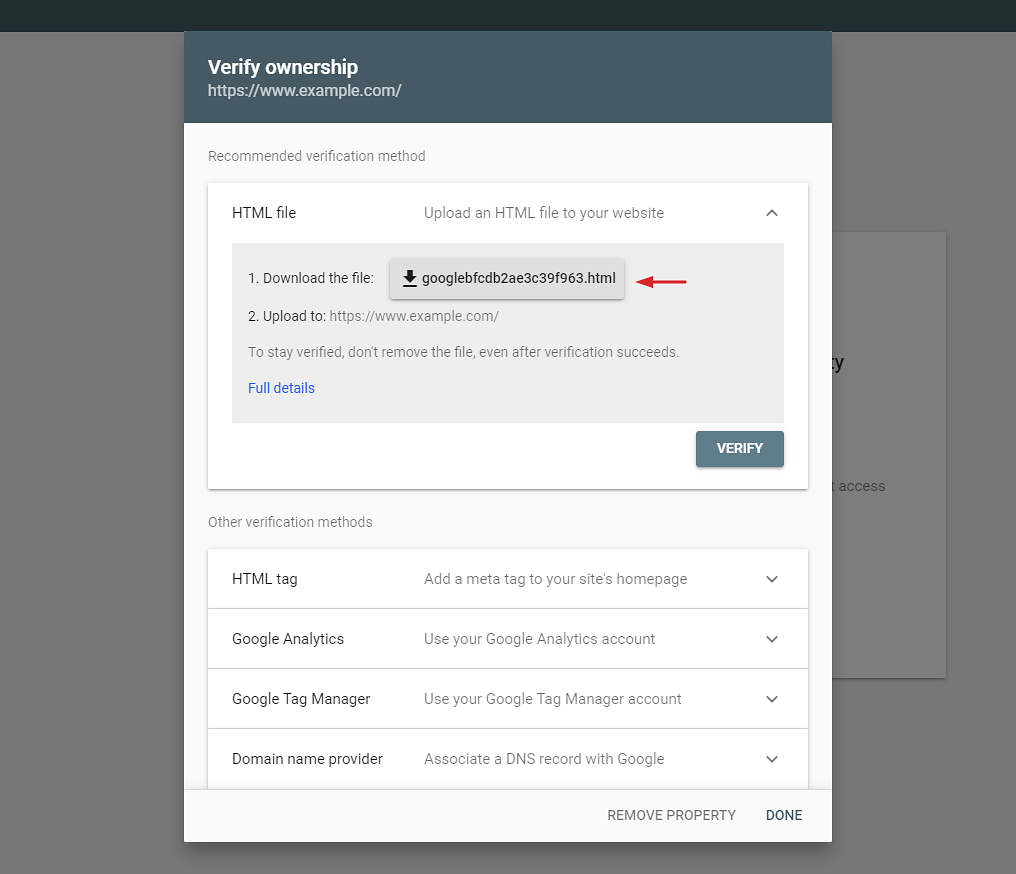
Upload an HTML file to your host server
- Click on Add Property.
- Select the URL prefix property type, enter your subdomain and click continue.
- Download the file provided to you by Google.
- Upload the file to the root folder of your host server.
- Return to the Search Console to finish the verification process.
Important note! You have to upload the file to the root directory of your website. If you have a WordPress site, the root will usually be the folder containing the wp-config.php file.
Verify by using your Google Analytics account
If you’ve already set up Google Analytics for your website, this is the easiest and fastest way to do it.
- Click on Add Property.
- Select the URL prefix property type, enter your subdomain and click continue.
- Select the Google Analytics method.
- You must have a gtag.js tracking code placed in the <head> section of your page.
- Click on verify.
Important note! To make your domain more visible, you will want to add and verify all the subdomains of your website, as mentioned above.
Well done, your site got added and verified. Now we should be ready to go!
First steps
Submit a sitemap
To give Google a map on how to index your website, you have to submit a sitemap. You can read more about this topic in one of our previous posts.
Select your target country
Google strives to provide the most relevant results to its users, which means that search results will vary from country to country. If you have a generic domain such as .com or .org, but you plan to target users in a specific country, it is important to let Google know what is your target audience.
This feature is part of the Legacy tools. Go to Legacy tools and reports > International Targeting, and you’ll get redirected to the old version of the Search Console. Select the Country tab and check the box on the left to enable the dropdown menu. Now, you’re able to select from a list of countries you want to target.
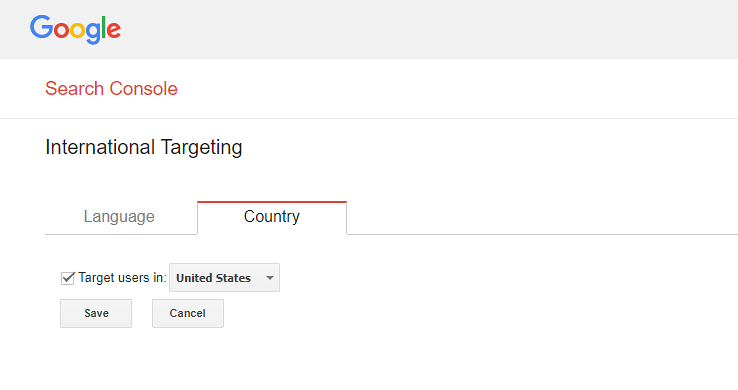
Important note! If you have a country-specific domain, then this will be selected by default, and you won’t be able to change it.
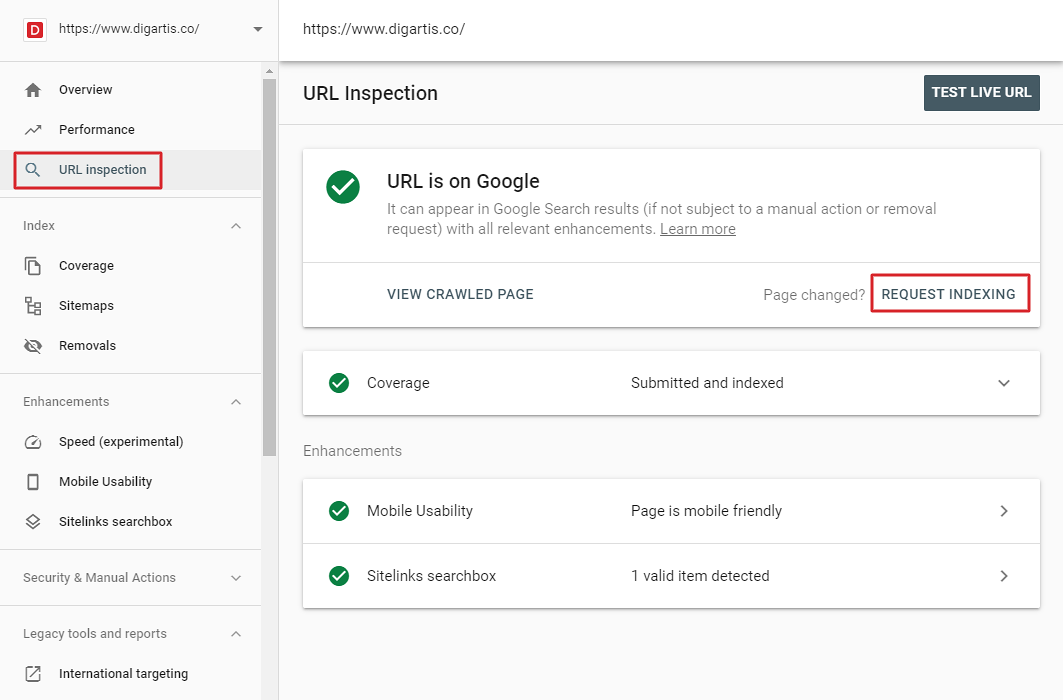
Request indexing
If you’ve made changes to your pages, the fastest way to get these updates indexed by Google is to request indexing manually. This way, your changes will appear in search results as soon as possible.
Click on URL inspection and enter the URL of the page you want to be indexed or inspected. After a few seconds, you will get a short report on your web page. Click on the Request indexing button (see image below), and that’s it.
Google has now sent its bots to crawl the content of your page. The changes should appear in Google within the next few days.
Site errors in Google Search Console
One of the best features of the Search Console is its notification system. If their bots found any issues while crawling your website, you will be notified via email so you can address these issues as soon as possible.
You can also find issues, errors, and manual actions listed in the console. Go to Security and Manual Actions to check if there are any critical issues with your website, such as malware or any other suspicious activities that may indicate your site got hacked.
For indexing errors – errors that happened because Google bots couldn’t successfully crawl a web page – go to Index > Coverage > Error tab.
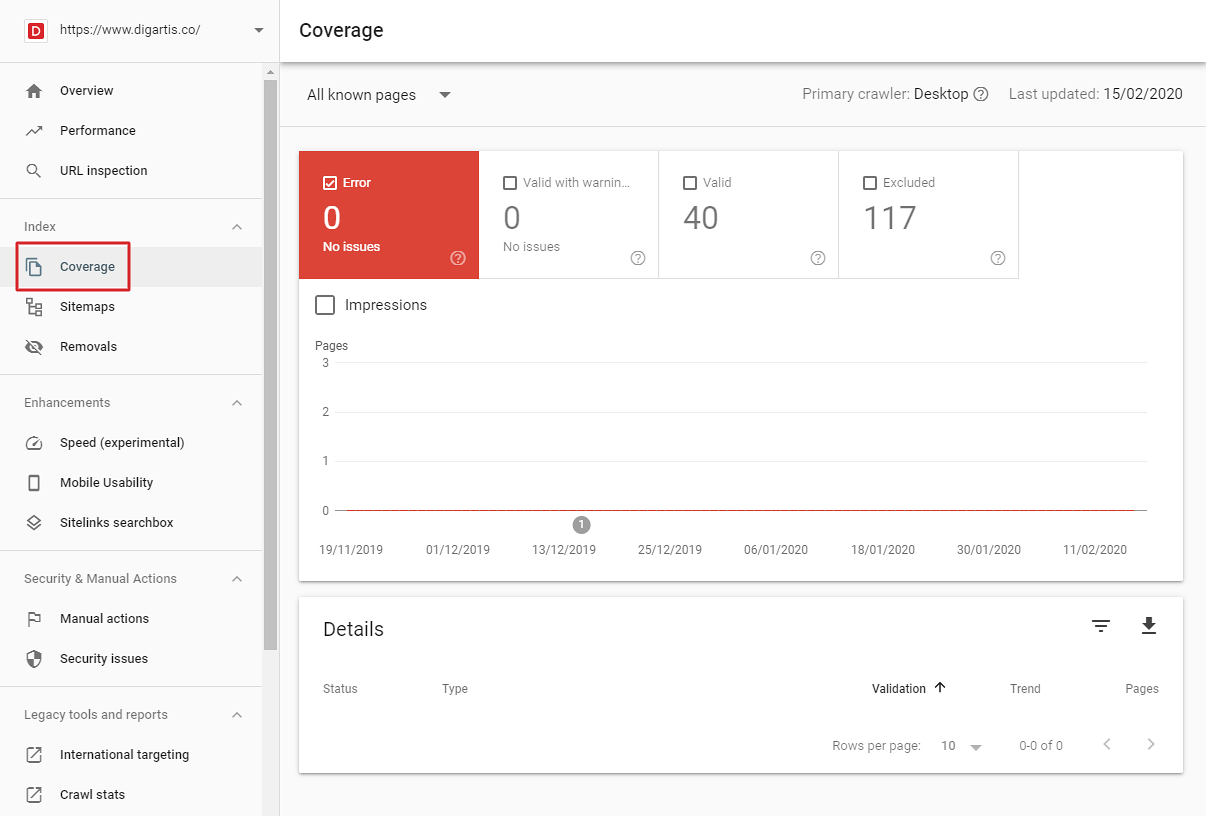
Index coverage report
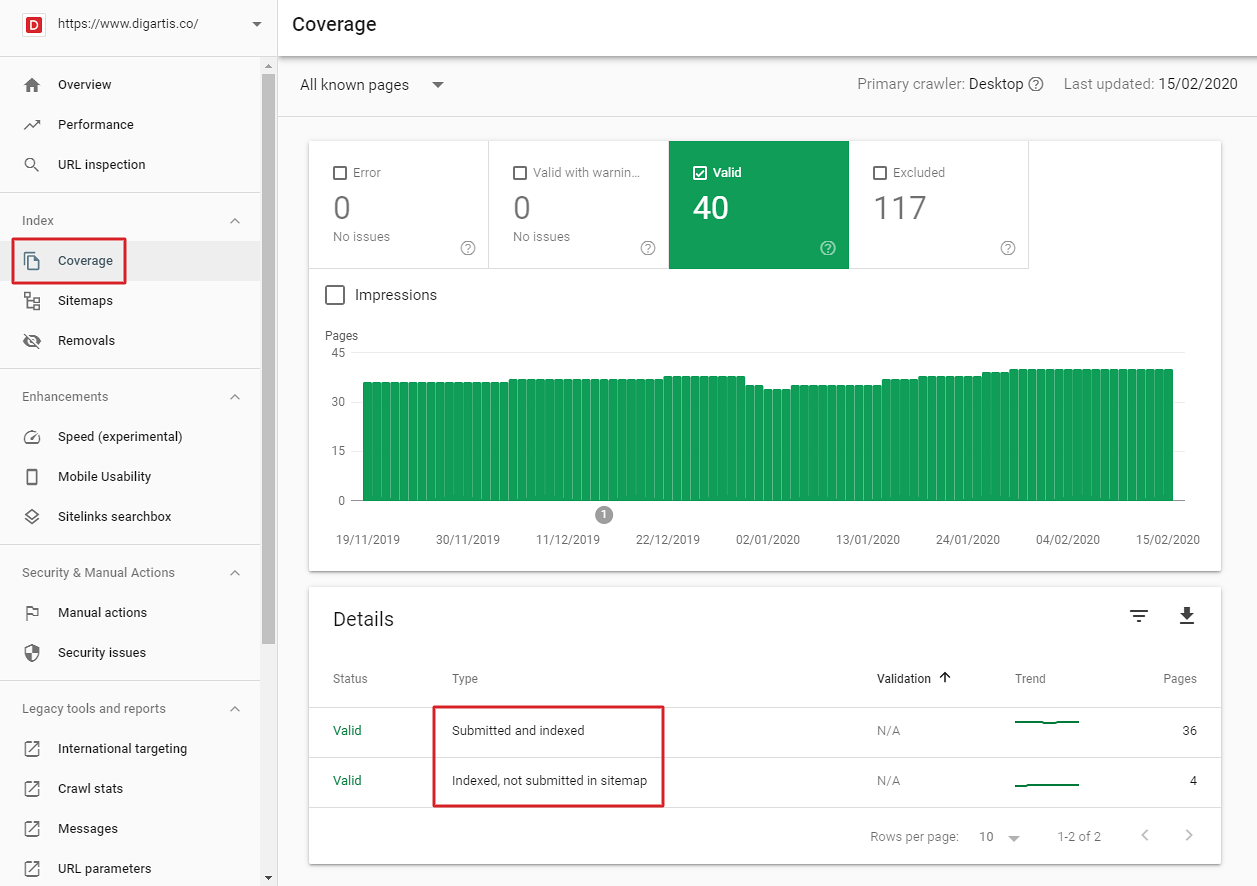
If you have done everything correctly and you have submitted your web pages for indexing, you should be able to see data in this section after a few days. It will tell you how many of your pages have been listed by Google. If you are adding new content, you should see this number increase over time.
Go to Index > Coverage > Valid tab. Now you can click on Submitted and indexed or Indexed, not submitted in sitemap to see a list of all successfully indexed pages on your website.
Conclusion
Google Search Console is a must for every website owner/administrator. Hopefully, this article will show you how to configure some of the most important settings to help Google index relevant content and display data you want in their search results.
Has this article helped you get your website indexed correctly? Let us know in a comment below!