When you’re managing a blog or a website, knowing the basics of HTML and CSS can be a very useful skill to have. Even if you’re not planning to build your own website from the ground up, certain things like styling text or making linked images, are important to know.
In this tutorial, I’ll explain what HTML is, what the difference is between HTML and CSS, and how to use the most basic HTML elements.
What is HTML?
HTML stands for Hyper Text Markup Language. It is a system of symbols and characters that tells the browser how to display the basic structure and content of a web page.
If this post didn’t use any HTML, it would start like this:
HTML Basics for Bloggers When you’re managing a blog or a website, knowing the basics of HTML and CSS can be a very useful skill to have. Even if you’re not planning to build your own website from the ground up, certain things like creating stylized text or making linked images, are important to know. In this article, you will learn what HTML is, what the difference is between HTML and CSS, and how to use the most basic elements. What is HTML? HTML stands for Hyper Text Markup Language. It is a system of symbols and characters that tells the browser how to display the basic structure and content of a web page.
Not very easy to read, right?
HTML vs. CSS – what’s the difference?
– Whereas HTML is what forms the structure of a web page, CSS is what we use to style the HTML elements with colors, backgrounds, font sizes, etc.
– CSS is applied to the HTML. You can have HTML without CSS, but you can’t have CSS without HTML.
We’ll be talking more about CSS in the next article, but before we can do that, we first need to understand the basics of HTML.
Where Is HTML Written?
When creating a post or page in WordPress, you have two editing modes available to you, Visual and Code editor.
The visual editor is a user-friendly block editor, which allows you to format the content easily. You can also get a general idea of how your post will look from inside the editor itself. However, it is limited in how extensively you can take control over how your post looks.
To have full control of your content’s layout and structure, you have to write HTML code sometimes. Even though you can write HTML in the Code editor mode, this is not recommended. For this purpose it is better to use the Custom HTML block. This block allows you to write plain HTML without the risk of breaking the other blocks functionalities.

Another place where HTML knowledge might come in handy is creating a custom text widget. For example, when creating an ‘About’ widget, it’s useful to be able to include a link to your ‘About’ page and a photo of you.
How Is HTML Written?
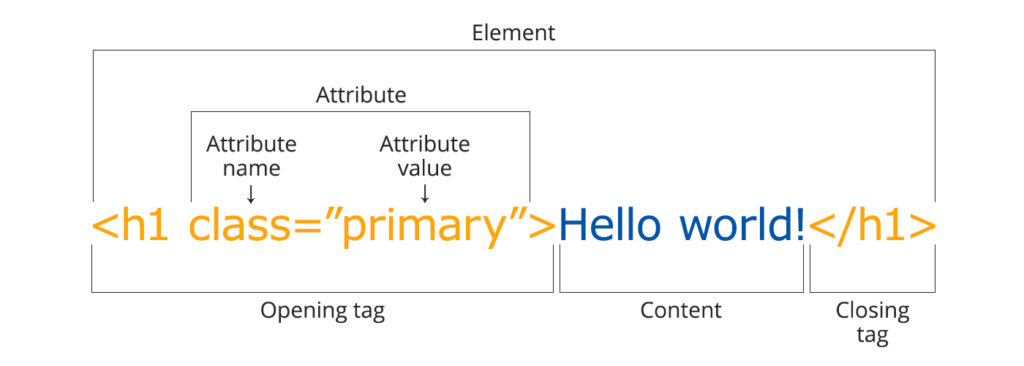
Element
The HTML element is everything from the opening tag to the closing tag.
Opening Tag
The opening tag consists of the element name, wrapped in opening and closing angle brackets. It can also include one or more attributes.
Closing Tag
The closing tag consists of an opening angle bracket followed by a forward slash, the element name, and a closing angle bracket.
Element Content
This is the content of the element, which in the example above is just text (Hello world!).
Empty Elements
There are also some elements that are empty, meaning that they only consist of an opening tag and do not have any content. An example would be a line break or an image.
<br>
<img src="images/icon.png" alt="My test image" />
Attributes
All HTML elements can have attributes. They provide additional information about an element and are always specified in the opening tag. They usually come in name/value pairs like: name=”value”
Basic HTML Tags
We’ll only be covering basic and most used HTML tags for bloggers in this tutorial. If you’d like to learn more, head on over to W3C Schools for a complete list of HTML tags.
Paragraph
Paragraphs are defined with the <p> tag. Adding paragraph tags will properly add the paragraph spacing between each paragraph.
<p>This is a paragraph.</p>Displays as
This is a paragraph.
Headings
Headings are defined with the <h1> to <h6> tags. <h1> defines the most important and <h6> the least important heading.
<h1>Heading 1</h1>
<h2>Heading 2</h2>
<h3>Heading 3</h3>
<h4>Heading 4</h4>
<h5>Heading 5</h5>
<h6>Heading 6</h6>
Displays as
Heading 1
Heading 2
Heading 3
Heading 4
Heading 5
Heading 6
Links
Links are defined with the anchor tag <a> and need a destination URL – href attribute.
Basic link
<a href="https://www.digartis.co/">Digartis</a>Link opening in a new browser tab
The target=”_blank” attribute will open the link in a new window or tab.
<a href="google.com" target="_blank">Google</a>No follow
If you want to make a link ‘nofollow’ you can use the rel=”nofollow” attribute.
<a href="google.com" rel="nofollow">Google</a>Images
Images are defined with the <img> tag. It has two required attributes, src and alt, and it doesn’t have a closing tag.
Basic image
<img src="smiley.gif" alt="Smiley face">Src attribute specifies the URL (web address) of the image. URL can point to another website (like src=”https://www.example.com/image.gif”) or to a file within a website (like src=”image.gif”).
Alt attribute provides an alternate text (description) for an image if the user for some reason cannot view it (because of slow connection, an error, or if they use a screen reader).
Image Size – Width and Height
You can use the width and height attributes to specify the size of an image. It can be expressed in pixels or percentages.
<img src="smiley.gif" alt="Smiley face" height="42" width="42">Image link
To use an image as a link, put the <img> tag inside the <a> tag.
<a href="https://www.yourlink.com"><img src="yourimage.jpg" alt="describe this image"></a>Span
Span element starts with a <span> tag. This element comes in handy when you want to style a specific part of a paragraph or heading differently than the rest of it. Say, you want to change the color or font size of a single word within a heading. The easiest way to achieve this is to wrap this word within the span tags, and then you can apply your own styles to it.
<p>This <span>word</span> can be styled differently than the rest of this paragraph</p>Lists
Unordered (bulleted) List:
An unordered list starts with the <ul> tag. Each list item starts with the <li> tag.
<ul>
    <li>List Item 1</li>
    <li>List Item 2</li>
    <li>List Item 3</li>
</ul>
Displays as
- List Item 1
- List Item 2
- List Item 3
Ordered (numbered) List:
An ordered list starts with the <ol> tag. Each list item starts with the <li> tag.
<ol>
    <li>List Item 1</li>
    <li>List Item 2</li>
    <li>List Item 3</li>
</ol>
Displays as
- List Item 1
- List Item 2
- List Item 3
Text Formatting
<strong>This text is bold</strong>
<em>This text is italic.</em>
<p>This text is <del>strikethrough.</del></p>
<p>This is <sub>subscripted</sub> text.</p>
<p>This is <sup>superscripted</sup> text.</p>
Displays as
This text is bold
This text is italic.
This text is strikethrough.
This is subscripted text.
This is superscripted text.
Horizontal line
The <hr> tag creates a line across the page. It can be used for separating one part of your blog post from another. It has no closing tag.
<hr>which displays on the screen like this:
Line break
The <br> tag creates a single line break (not a paragraph break). It’s an empty tag which means it has no closing tag.
<p>To break lines,<br>use the br element.</p>Displays as
To break lines,
use the br element.
Do you feel more confident about using or editing HTML on your blog now? Are there any HTML tags you are struggling with? Leave a comment below.