Every day thousands of websites get hacked and blacklisted by Google. A compromised website can seriously damage your personal or business reputation, cause downtime and inconveniences for your visitors, and ultimately affect your revenue.
If you’re serious about your website or blog, you have to take extra precautions to prevent that. You’re probably nodding your head at this point, but you aren’t sure how to tackle this. Well, I’ve got good news for you. It’s not that complicated. These seven simple steps will make your website more secure and help you sleep better at night 🙂
1. Keep your software up-to-date
This is by far the most valuable security tip anyone can give you. Outdated themes, plugins, and WordPress versions are the easiest targets for hackers. By updating these regularly, you’re greatly reducing the chances of your website getting hijacked by the bad guys.
2. Improve your password strength
Weak passwords and usernames are vulnerable to brute force attacks where hackers use sophisticated software to guess your password. To protect against such attacks, passwords should be composed of a combination of uppercase and lowercase letters, numbers, and special characters. They should be at least ten characters long and should be changed regularly.
How to change your WordPress admin password?
In the admin area, go to Users and select a user from the list. Scroll down to Account Management and click on Generate Password. The system will generate a new password automatically. You can keep using this one or change it to anything you like. WordPress will indicate the strength of your password, so make sure it’s strong enough! Click the Update Profile button at the bottom of the page to save it.

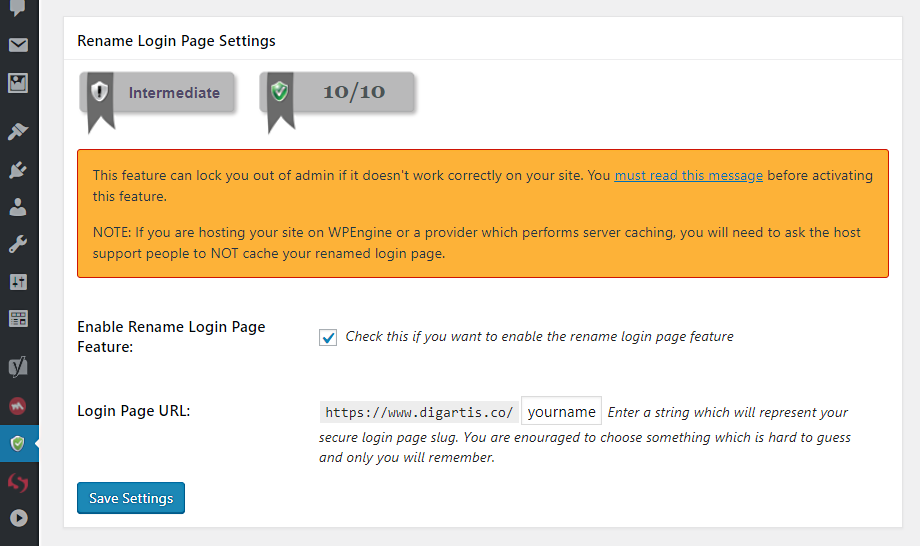
3. Change the admin login page URL
More often than not, hackers will try to gain access to a WordPress website by targeting the default admin login page (www.yoursite.com/wp-admin/). If you change this default URL, you will effectively protect your site against all such threats.
This can be a very technical task, but luckily there are plugins to do that for us. We have been using All In One WP Security & Firewall, which is a free, comprehensive security plugin that’s very easy to use.
Install and activate the plugin, go to WP Security > Brute Force and change the login page URL to anything you like. Now your default login page URL won’t work anymore, so the next time you log in, you will have to use your new URL instead.
4. Add a security question to the admin login page
Adding a security question to your WordPress login page makes it much harder for automated scripts to get unauthorized access. The All In One WP Security plugin helps us achieve that with just a few clicks.
Go to WP Security > Brute Force and select the Login Captcha tab. Now you can activate the login page security question by checking Enable Captcha On Login Page or alternatively install Google reCAPTCHA.
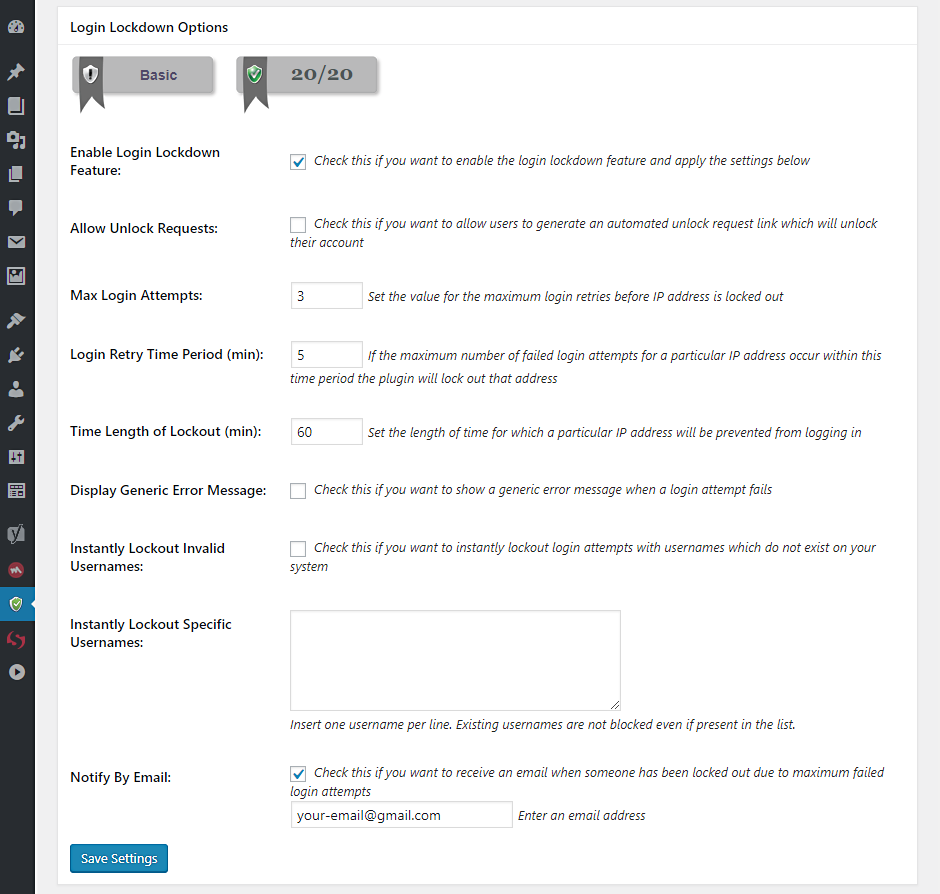
5. Limit login attempts
By default, WordPress allows users to try to log in as many times as they want. Hackers may exploit this to crack passwords by attempting to log in with different combinations. By setting the maximum amount of attempts to a small number, you make their job almost impossible. This additional layer of security, combined with steps 2, 3, and 4, will make your website bulletproof against brute force and some other common cyber attacks.
Go to WP Security > User Login and select the Login Lockdown tab. Activate the feature by checking Enable Login Lockdown Feature. When checked, you’ll be able to set the max login attempts (we recommend using between 3 and 10), the time length of the lockout (we recommend between 30 to 60 minutes), and other settings to ensure this feature is doing its job. Furthermore, make sure to check the Notify By Email option and enter your preferred email. This way, if there is ever a failed login attempt, you will get a notification on your email.
6. Enable a firewall
A firewall stops malicious scripts before they get a chance to mess with the code on your WordPress website. All In One WP Security comes with a basic firewall that’s very easy to use and will be enough for most websites. However, if your site contains sensitive data, we recommend that you explore other premium firewalls, such as Cloudflare WAF, Jetpack, or others.
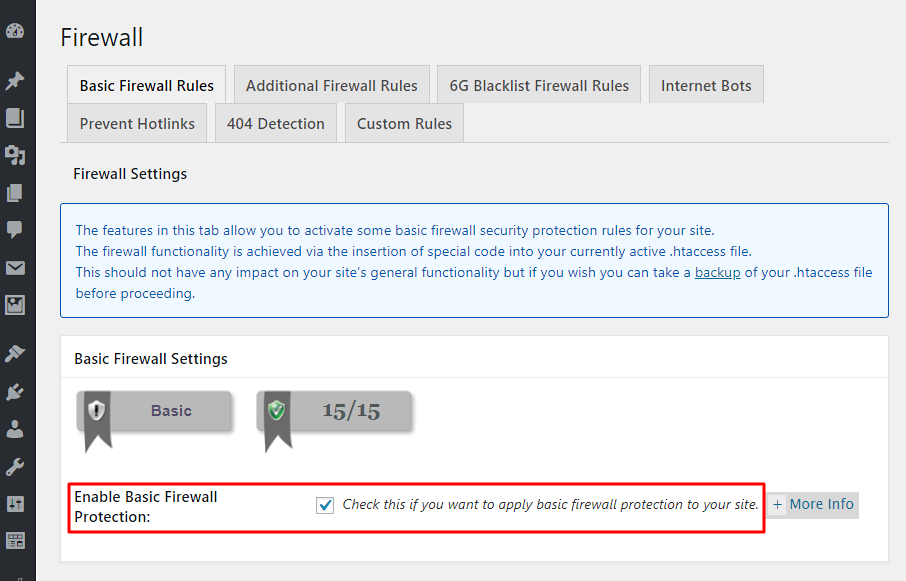
To activate the firewall, go to WP Security > Firewall and select the Basic Firewall Rules tab. All you need to do to activate it is to check Enable Basic Firewall Protection.
7. Change the WordPress Database Prefix
The database is the most valuable part of your website because it stores all data. It’s also one of the hacker’s favorite targets. They use a variety of scripts to gain unauthorized access, steal sensitive data, and inject malicious code into the database. The smartest and easiest way you can protect your database is by changing the database prefix.
The database prefix is a sequence of characters before the database table name. The default prefix in WordPress is wp_. Every hacker worth a grain of salt knows this. That’s why is absolutely crucial to change the database prefix for all tables!
How to change the database prefix?
You can easily change the default database prefix during installation by changing the Table Prefix field. But since you’re reading this section, I am assuming you haven’t done it back then. Don’t worry, the All In One WP Security plugin is here for the rescue once again 🙂
Go to WP Security > Database Security and select the DB Prefix tab. In the Generate New DB Table Prefix section enter a new database prefix manually (we recommend at least 3 to 6 characters), or click on the checkbox above to generate a random one for you. Hit the Change DB Prefix button, and that’s it! Your database is much safer now.
Important note! In some rare cases, changing the database prefix can break your website. For this reason, you should always back up your database before changing the prefix.
How do you keep your website secure? Please share your tips and experiences with all of us in the comments below.